


On this page 6 sections
Your guide
What you'll learn
The Lateral Collateral Ligament (LCL) is the less commonly known cousin of the Anterior Cruciate Ligament (ACL). For this reason those who suffer an LCL injury can often find themselves feeling at a loss for guidance. The LCL, however, plays an important role in the stabilizing the knee and can create a variety of issues when injured. This article will delve into the anatomy of the LCL, the most common mechanisms of injury, as well as the exercises essential for success in LCL rehab.
What is the LCL?
The LCL is a cord-like ligament situated on the outer (lateral) part of the knee joint. It extends from the lateral epicondyle of the femur to the head of the fibula, effectively connecting the thigh bone to the smaller bone in the lower leg (1).

For this reason, it is also sometimes known as the fibular collateral ligament. Its primary function is to provide lateral stability to the knee, preventing it from buckling outward under excessive varus stress. Secondarily it provides rotary stability to the knee, preventing it from excessive rotation in the posterior-lateral direction (3).
Although the LCL is not as commonly injured in isolation as the ACL or the medial collateral ligament (MCL), it does occur. Most commonly, isolated LCL injuries occur due to trauma, particularly in contact sports such as wrestling, martial arts, and football as well as during car & skiing accidents (6).

Diagnosing an LCL injury:
The hallmark symptoms of an LCL injury include point tenderness and pain along the outer portion of the knee, swelling, and instability. In more severe cases, those with an LCL injury may display a “thrust” gait or an excessive bowing out of the leg during the primary weight-bearing portion of walking.
The gold standard for diagnosing an LCL injury is through the use of an MRI, although X-rays should be performed to rule out fractures. This is especially important given the potential for an avulsion fracture at the fibular head, where the LCL can remain intact but remove a piece of the bone from this site.
READ: YOU ARE NOT YOUR MRI - MRIS FOR FOR LOW BACK PAIN

Based on MRI results and the symptoms experienced, LCL injuries can be classified in one of three ways.
- Grade 1: Mild Sprain - Diagnosed with localized tenderness along the outside of the knee. No instability is present.
- Grade 2: Partial Tear - Diagnosed with more severe localized pain along the outside/back of the knee and swelling.
- 5 to 10 mm of laxity or looseness is observed when the ligament is given a varus stress, however, there is a fixed endpoint of the ligament.
- Grade 3: Complete Tear - A higher level of pain and swelling.
- >10mm of laxity or looseness is observed when the ligament is given a varus stress, often with no fixed endpoint.
- Often includes additional injuries to the other stabilizing structures of the knee (1).
Treatment of LCL injuries:
Grade 3 injuries are most often treated surgically with reconstruction utilizing a graft from the patient’s hamstring being the preferred method (2). Depending on the specific guidelines from the surgeon, many patients are asked to be non-weightbearing in a knee immobilizer for 6 weeks after surgery with hamstring strengthening exercises avoided for 16 weeks after surgery to protect the reconstruction.
Grade 1 & 2 injuries often can heal without surgery, however still require rehab to return to their prior level of function, stability, and confidence. In almost all cases patients should be in a hinged brace protecting the knee from varus stress for 4-8 weeks after injury.
The primary goals of rehab when recovering from all grades of LCL injuries include:
- Protect the healing ligament or reconstruction:
- Pain is often a great guide for this, in general, if you have pain along the outside of your knee during an activity in the first 12 weeks after injury or surgery this is a reason to modify the activity
- Maximize your pain-free range of motion:
- In allowing the injured or surgically reconstructed area to heal, often you are asked to limit your range of motion for some time through bracing. To return to full function you must restore this range of motion. This is best done through pain-free passive exercises.
- Re-establish & Maximize the strength of the leg muscles:
- Like any ligamentous knee injury, LCL injuries create a cycle of pain & swelling that leads to decreased activation of the muscles surrounding the knee, most notably the quadriceps muscle. Without a focused and targeted rehab, these muscles will not return to their previous level of strength
- Periods of inactivity & immobilization also lead to atrophy and decreased activation of the other muscles of your knee and leg, this includes most notably the hamstring muscles, calf muscles, and the muscles of the hip.
- In rehabbing after an LCL injury you must also make sure you overcome the atrophy & deconditioning that comes from the necessary period of modified activity.

Exercises for LCL Injury:
Your priority after an LCL injury is to maintain the pain-free range of motion that you have. Thus you will want to work your knee with the help of gravity in both directions, including bending and straightening. You must do these exercises with the goal of gradual progression and avoid pushing into pain:
Exercise 01 of 06
Exercise demonstration
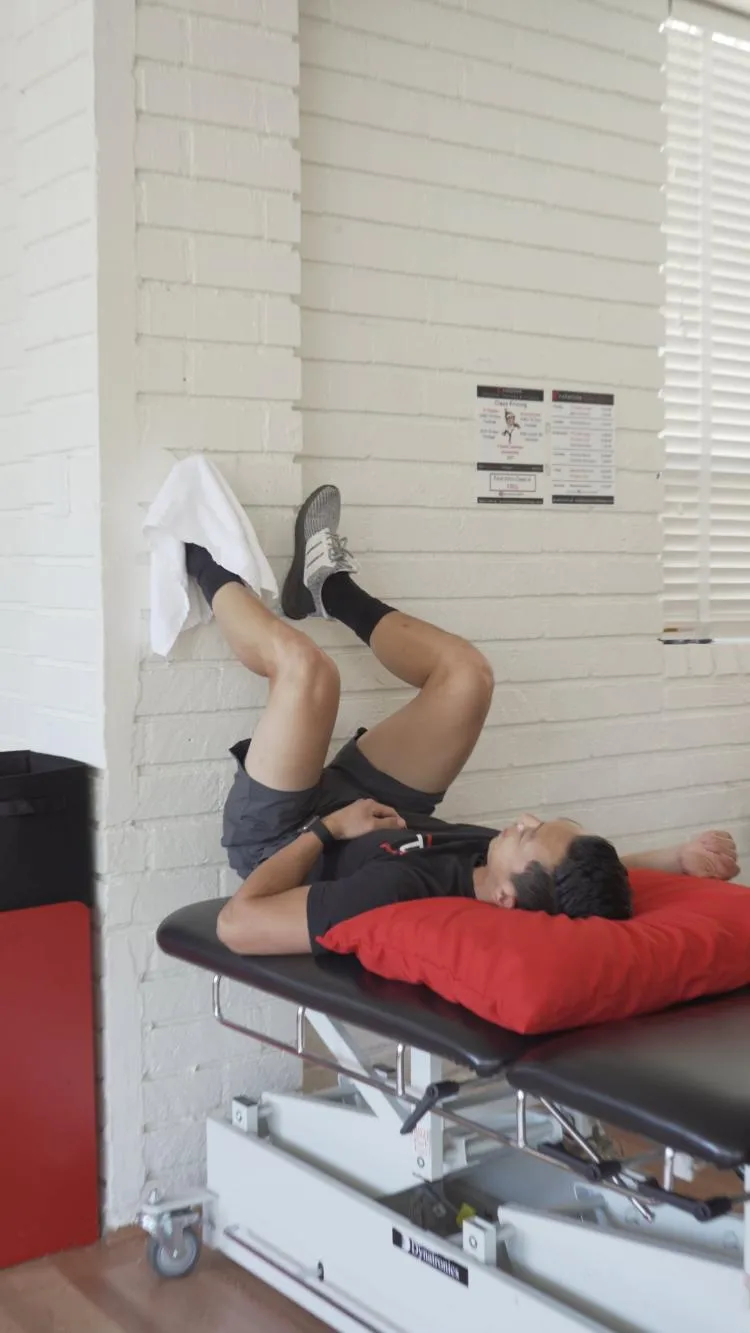
Knee Flexion On Wall - PROM
View exercise instructions
- HOW: Lie on your back close to a wall. Place your affected leg on the wall. Make sure your heel can slide on the wall, so wear a sock or place a pillow cloth or something else slippery around your foot so that it can slide. Slowly let gravity slide your leg down. As your leg slides down, your knee will bend more, which is the goal of this exercise. Bend as far as you can, hold that stretch for a few seconds, then return back to the starting position. Repeat.
- FEEL: You should feel a slightly uncomfortable stretch at the end of your range. This is common and the goal of this exercise is to feel that little bit of discomfort so don't be alarmed.
- COMPENSATION: Let gravity bring your foot down as it slides against the wall, don't try to move it yourself. Go slow!
Exercise 02 of 06
Exercise demonstration
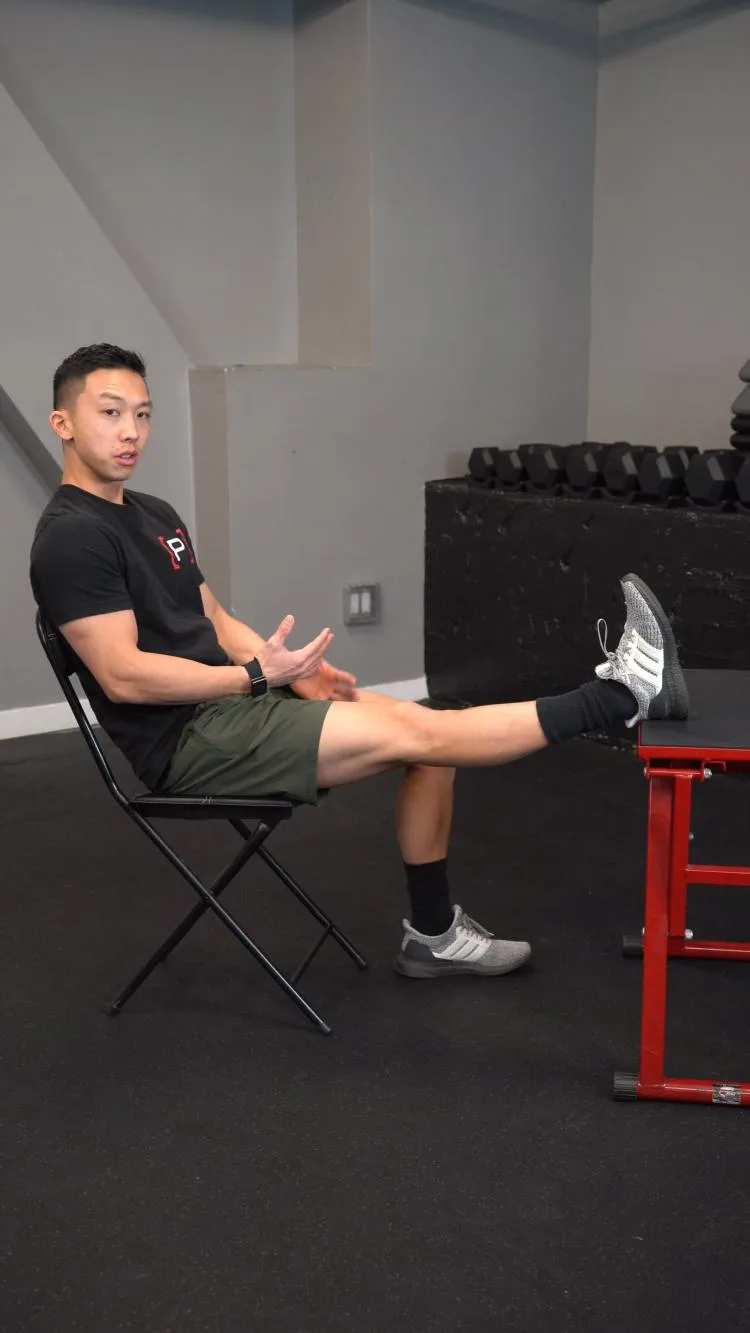
Seated Knee Extension - PROM
View exercise instructions
- HOW: Get into a comfortable position on a chair or bed with your foot elevated and supported on a surface so that your leg is straight and parallel to the ground. Let gravity pull your knee into extension and/or use your hands as needed to help move your knee into extension. Hold until your knee begins to feel a little uncomfortable – not painful. Then relax your leg. Repeat as needed or prescribed.
- FEEL: This should feel like a stretch behind your knee, maybe even your calf and hamstring. It can be normal sometimes to feel discomfort in the front of the knee, try to readjust your position if it is not tolerable discomfort. See video for other tips.
- COMPENSATION: Do not let your foot rotate out to the side. Make sure to only prop your foot on the chair so there is an empty space under your knee.
You will also want to start to activate the muscles around your knee safely. Most especially the quadriceps and the hamstring muscles. Working utilizing isometrics is a great way to do this:
Exercise 03 of 06
Exercise demonstration
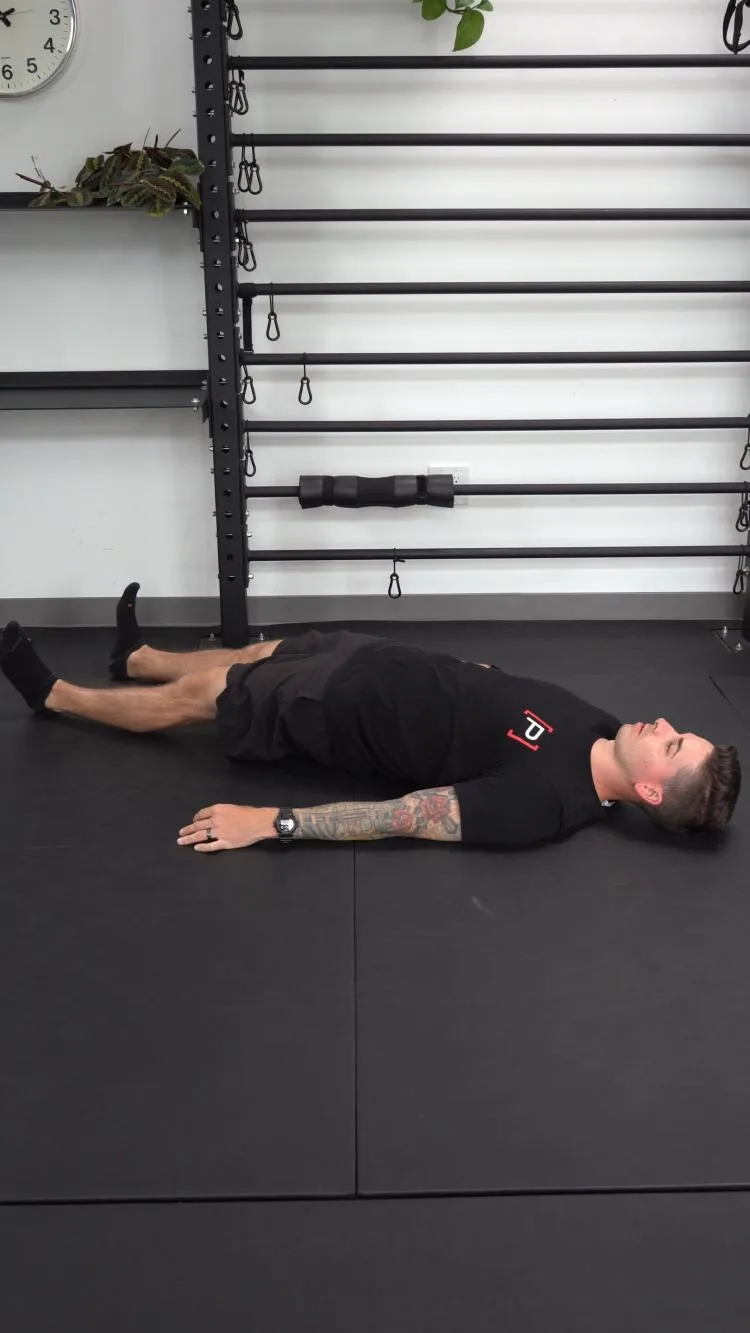
Supine Heel Dig - Knees Straight
View exercise instructions
- HOW: Get set-up laying flat on your back with your legs straight. While keeping your knee straight, dig your heel into the ground as hard as you can trying to bend your knee, but nothing should be moving.
- FEEL: You should feel the muscles behind your thigh and your butt muscles working.
- COMPENSATION: Do not arch your back, do not bend your knee, do not lift your butt up off the ground.
Exercise 04 of 06
Exercise demonstration
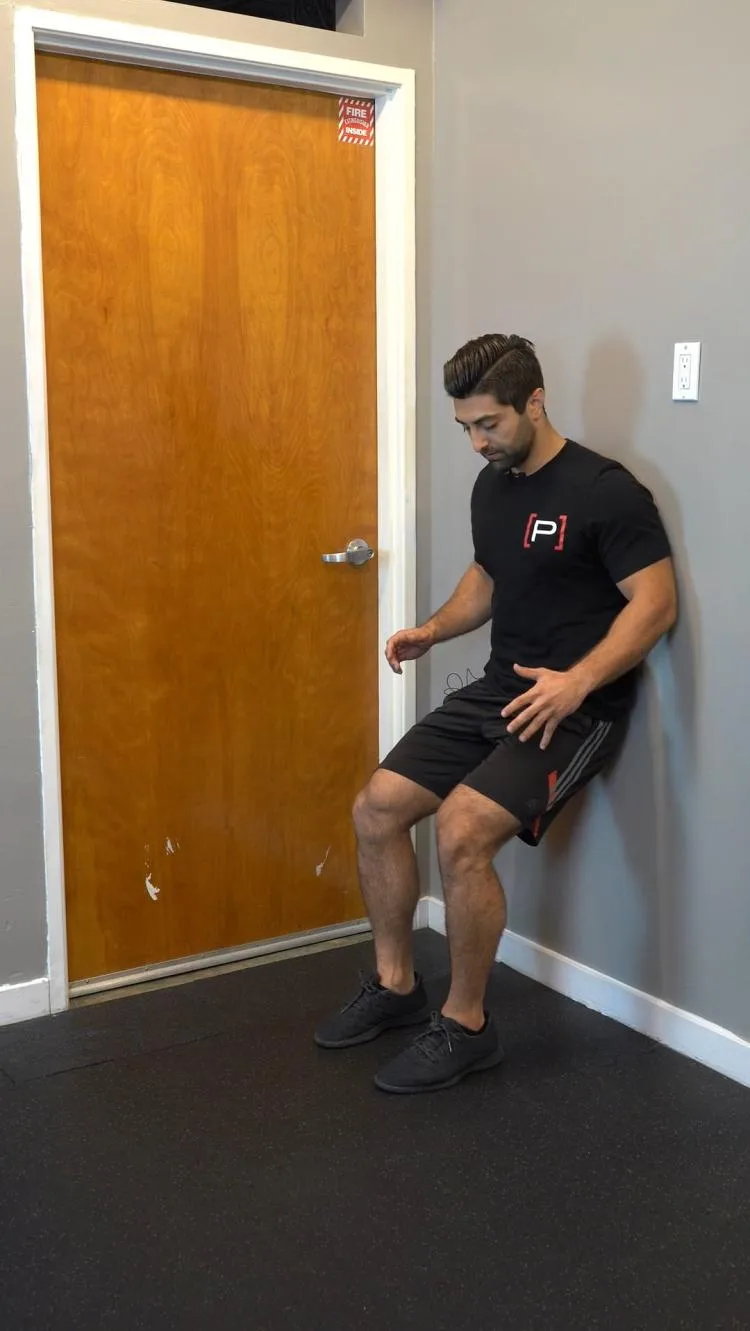
Wall Sit - 45 deg
View exercise instructions
- HOW: Begin in a standing position with your feet about hip width apart. Next focus on lowering yourself half way down and hold this position. Make sure to keep your back on the wall for the entirety of this exercise. The further you bring your feet away from the wall, the more challenging this exercise will be.
- FEEL: You will the muscles in the front of your thigh working with this exercise.
- COMPENSATION: Avoiding rounding at the back as you lower yourself on the wall. Maintain a straight back as you lower yourself.
Over time you will want to gradually progress the intensity and resistance of the challenges to those muscles as your symptoms and the healing of the tissue allows.
Exercise 05 of 06
Exercise demonstration
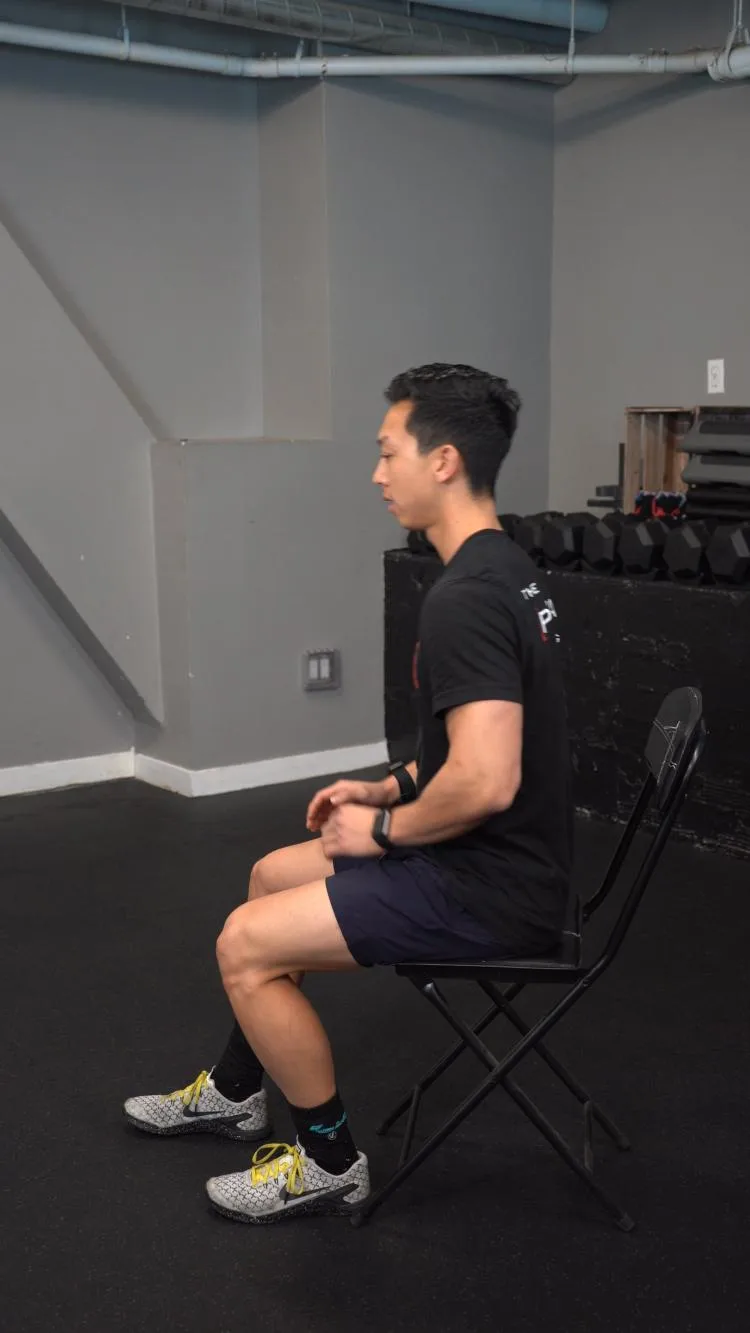
Staggered Sit To Stand
View exercise instructions
- HOW: Stagger your feet by placing one foot slightly forward, making sure that your feet are about shoulder width apart. Then, completely sit down on the box in a controlled manner with good squat form. Then stand back up.
- FEEL: You should feel the muscles in the legs working, but the forward leg will be working less.
- COMPENSATION: Try to avoid shifting your hips side-to-side. Try your best not to fall into the chair. Try to control yourself as your lower into the chair. Do not use momentum to stand up, if able.
Exercise 06 of 06
Exercise demonstration
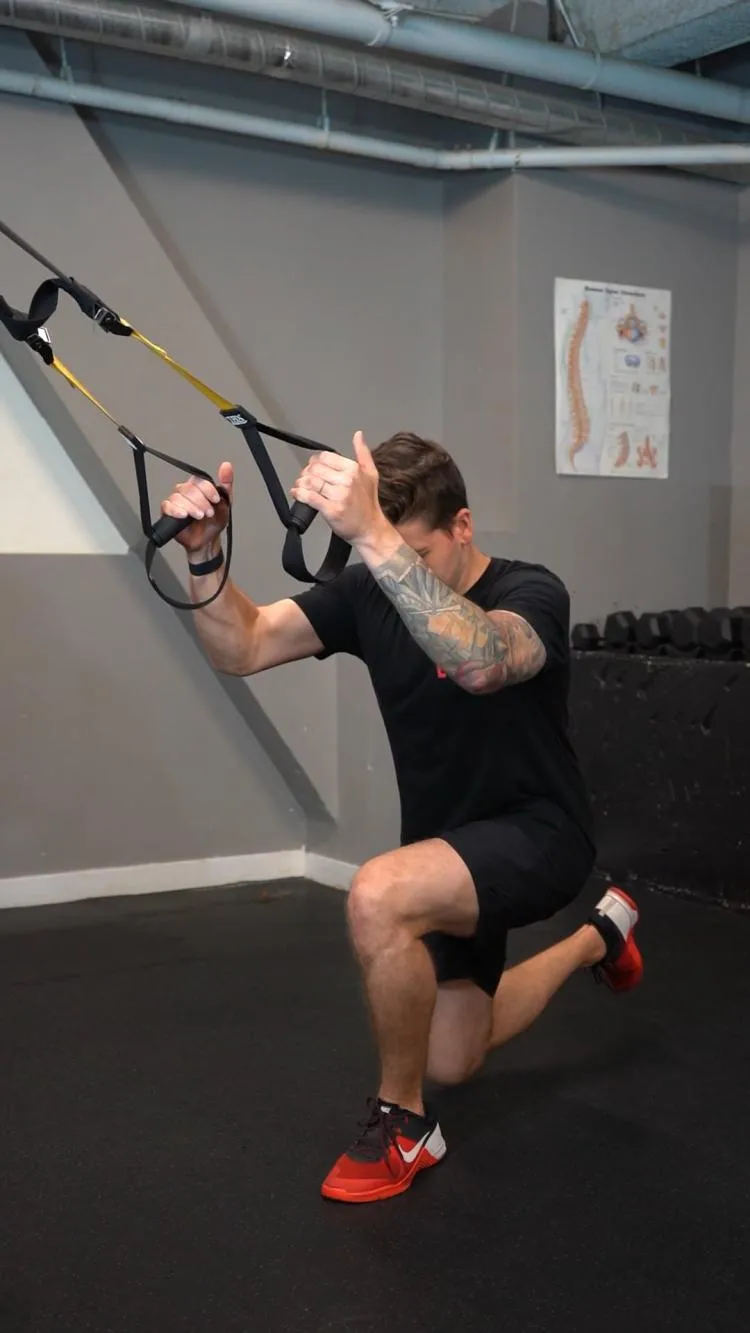
Single Leg Squat - TRX
View exercise instructions
- HOW: Get set up in a standing position with a suspension trainer anchored in front of you. Start by holding the suspension trainer handles in each hand with a soft bend in your elbow. To begin the exercise, balance on one leg and have the other leg supported in the air behind you with the knee bent. Perform the exercise by bending your hip and knee to perform a single leg squat, as you lower down you should reach back with the leg that is supported in the air. Lower down as far as you can control, then focus on pushing the ground away to return to starting position and repeat. Only use the suspension trainer for minimal assistance as needed.
- FEEL: This should feel like a full lower body workout, specifically your quads, glutes, and hamstrings. If you feel your upper body working hard, you're relying on the suspension trainer too much.
- COMPENSATION: Do not over-rely on the suspension trainer and lean back on it with all of your weight. Only use the suspension trainer as needed. Focus on good single leg squat form, keep your knee stacked over your foot and maintain and a level pelvis. Do not let your knees cave in or hips/pelvis rotate. Do not lean side-to-side with your trunk.
Closing Thoughts:
Although rare, isolated LCL injuries do occur, especially in traumatic circumstances such as those that occur during martial arts, wrestling, football, and skiing. While lesser known, the LCL plays an important role in the stability of the knee and must be fully rehabilitated to allow a return to the same level of activity with confidence. Rehab should first and foremost respect the healing tissues of the injured or surgically reconstructed LCL. While doing this, the focus should be on restoring and retaining any range of motion that has been lost through passive, gravity-assisted exercises in a pain-free fashion. Additionally, rehab should also focus on restoring any strength that is inherently lost when this injury occurs, particularly to the quadriceps, hamstrings, and calves. This should be done by starting with pain-free isometric exercises and gradually progressing to progressively overloaded resistance exercises as outlined in the sample above. This focus will not only allow full restoration of function but will also minimize the risks of recurrent injuries to the other structures in the knee.
References:
- Yaras RJ, O'Neill N, Yaish AM. Lateral Collateral Ligament Knee Injury. In: StatPearls. Treasure Island (FL): StatPearls Publishing; May 20, 2022.
- Moulton SG, Matheny LM, James EW, LaPrade RF. Outcomes following anatomic fibular (lateral) collateral ligament reconstruction. Knee Surg Sports Traumatol Arthrosc. 2015;23(10):2960-2966. doi:10.1007/s00167-015-3634-4
- LaPrade RF, Ly TV, Wentorf FA, Engebretsen L. The posterolateral attachments of the knee: a qualitative and quantitative morphologic analysis of the fibular collateral ligament, popliteus tendon, popliteofibular ligament, and lateral gastrocnemius tendon.
- Wilson WT, Deakin AH, Payne AP, Picard F, Wearing SC. Comparative analysis of the structural properties of the collateral ligaments of the human knee. J Orthop Sports Phys Ther. 2012;42(4):345-351. doi:10.2519/jospt.2012.3919
- Bushnell BD, Bitting SS, Crain JM, Boublik M, Schlegel TF. Treatment of magnetic resonance imaging-documented isolated grade III lateral collateral ligament injuries in National Football League athletes. Am J Sports Med. 2010;38(1):86-91. doi:10.1177/0363
- Lundblad M, Hägglund M, Thomeé C, et al. Epidemiological Data on LCL and PCL Injuries Over 17 Seasons in Men's Professional Soccer: The UEFA Elite Club Injury Study. Open Access J Sports Med. 2020;11:105-112. Published 2020 May 13. doi:10.2147/OAJSM.S2379
About The Author
Tommy Mandala, PT, DPT, SCS, OCS, CSCS
Prehab Writer & Content Creator
 Tommy Mandala is a Doctor of Physical Therapy, Board Certified Clinical Specialist in Sports & Orthopedics, and Certified Strength and Conditioning Specialist in New York City. He is the founder of ALL IN ACL, a digital coaching platform dedicated exclusively to helping ACLers return to the life they had before their injury with full confidence in their knee. Prior to that, he worked in the sports clinic at Hospital for Special Surgery, the #1 Orthopedic Hospital in the country. While there, he had the opportunity to hone his skills as an ACL specialist working closely with world renowned surgeons and evaluating patients from all over the world. He completed his sports residency training at the University of Delaware where he had opportunities to work with many of their Division I sports teams as well as the Philadelphia 76’ers NBA G-league affiliate, the Delaware Blue Coats. He also trained at Champion Sports Medicine in Birmingham, Alabama where he had the opportunity to learn from researchers in the American Sports Medicine Institute. Currently, Tommy works exclusively with ACLers through his digital coaching model. While many of these clients are athletes, Tommy works with ACLers of all different abilities helping them to build the strength they need to overcome this unique injury. One of his favorite aspects of his job is taking active clients who have never been a “gym person” before and showing them the amazing things that happen when they learn to strength train.