

On this page 7 sections
Your guide
What you'll learn
Thoracic Outlet Syndrome (TOS) is a fairly common diagnosis, affecting approximately 8% of the population. Pain with TOS often presents anywhere between the neck, face, occipital region or into the chest, and shoulder, with paresthesia into the upper extremity based on where the symptoms are originating from. Similar to other conditions, this diagnosis encompasses a host of signs and symptoms, yet does not always tell us the specific pain generator. TOS can be broken down into neurogenic TOS (95-98% of cases according to Davidovic et al. 2003) vs. vascular TOS (1). Furthermore, vascular TOS can further be subdivided into either Arterial TOS or Venous TOS. In this article, we will help you understand what thoracic outlet syndrome is, the causes behind it, and excellent exercises for thoracic outlet syndrome!
Thoracic Outlet Syndrome: What Is It?
As previously stated, the thoracic outlet is a nonspecific label. It can be a difficult condition to diagnose, and clinicians should consider this pathology when differentially diagnosing symptoms originating from the neck and shoulder girdle. When classifying this syndrome, it should be defined by the type of TOS, whether it be arterial, venous, or neurogenic. According to the Journal of Vascular Surgery, neurogenic TOS is the most common type of TOS, with over 90% of all patients being compromised (2).
Improve Your Thoracic Outlet Symptoms with This FREE Workout

Healthy mobility of the midback is crucial to managing Thoracic Outlet Syndrome-related symptoms. This 10-minute Midback Mobility routine is designed to get you moving appropriately. Get started for free today!
Adson was the first to describe TOS, which was originally thought to be solely an arterial issue, yet literature and research have evolved over the years. In the present day, it is understood that in addition to the subclavian artery, the subclavian vein and/or the brachial plexus may also be compressed. The loose definition of TOS is, "upper extremity-related symptoms due to compression of the neurovascular bundle by various structures in the area just above the first rib and behind the clavicle" (2).
Thoracic Outlet Relevant Anatomy

Thoracic Outlet Syndrome: Potential sites of compression
In the image above, you will notice that there are 3 various areas where anatomical contents may become compressed, ultimately leading to thoracic outlet syndrome (1,2,3):
- Interscalene triangle: Between the anterior and middle scalenes. This is the most medial compartment, and its borders are created by the anterior scalene muscle anteriorly, middle scalene muscle posteriorly, and first rib inferiorly. The brachial plexus and subclavian artery pass through this triangle
- Costoclavicular space: Between the clavicle and the first rib. This is bordered by the subclavius muscle anteriorly and the clavicle superiorly. The first rib and anterior scalene muscle from the inferior and posterior borders. The brachial plexus, subclavian artery, and vein all pass through this compartment.
- Subcoracoid or Sub-pectoralis minor space: Beneath the coracoid process and under the pectoralis minor tendon. The brachial plexus passes through the subcoracoid space, and the subclavian artery and vein continue through it as the axillary artery and vein.
Your Solution To Getting Rid of TOS Is Within This Program!

You may not feel your thoracic outlet (TOS) symptoms in your mid back, but that doesn't mean that your mid back isn't the culprit. Also, having adequate neck health can also help prevent as well as promote recovery from TOS. Get started HERE!

Thoracic Outlet Syndrome: What Can Cause It?
When diagnosing TOS or even any condition for that matter, history taking is essential. The subgroups that have previously been described can be due to a congenital, traumatic, or functionally acquired etiology (1,3). For example, most patients with neurogenic TOS have a history of neck trauma preceding their symptoms, with automobile accidents being the most common followed by a stressful work environment (1). On the contrary, arterial TOS is often associated with a cervical rib, and therefore, plain films of the neck is a good screening tool to rule OUT arterial TOS (2).
- Congenital Etiologies:
- Cervical Rib
- Anomalous first rib
- Prolonged Transverse Process of C7 (seventh cervical vertebra)
- Enlarged Scalene Muscles (Chronic Obstructive Pulmonary Disorder (COPD), Bodybuilders)
- Cervicodorsal Scoliosis
- Congenital Elevated Scapula (Kippel-Fiel Syndrome)
- Traumatic Etiologies:
- Whiplash Associated Injuries
- Falls
- Functional Etiologies:
- Vigorous, repetitive activity associated with sports or work
Exercises for Thoracic Outlet Syndrome
Types Of Thoracic Outlet Syndrome: Arterial, Venous, And Neurogenic
When deciphering what type of thoracic outlet syndrome is present for an individual, it is helpful to understand the signs and symptoms of each type, which will be detailed below (1,3):
- Arterial TOS: By far the rarest of the 3 types. Common signs and symptoms include:
- Cold, pale fingers
- Sudden onset of hand pain and weakness
- Delayed capillary refill
- Ischemic arm fatigue
- Venous TOS: Also referred to as Paget-von Schroetter syndrome. Common signs and symptoms include:
- Raynaud's Phenomenon like symptoms
- Acute upper extremity swelling
- Cyanosis
- Heaviness in the arm and hand
- Neurogenic TOS: This is common in younger individuals who are involved in the repetitive overhead activity and/or heavy lifting. Symptoms will generally correspond in relation to the level of nerve compression. Common signs and symptoms include:
- Upper extremity paresthesias
- Neck Pain
- Trapezius muscle Pain
- Shoulder and/or arm pain
- Chest Pain
- Occipital headaches
- Paresthesias in various fingers of the hand
LISTEN: POSTURE WITH THE PREHAB GUYS

Thoracic Outlet Syndrome: Conservative Treatment
Research in relation to the conservative treatment of thoracic outlet syndrome is sparse, as it is not as common of a diagnosis in comparison to other upper extremity-related conditions. However, a multimodal treatment approach that consists of patient education, certain medications, and specific rehabilitative exercises has shown positive results. For the scope of this article, we will show you various exercises for thoracic outlet syndrome that you can simulate! What these exercises target specifically is scapular musculature engagement, deep neck flexor strength, thoracic spine mobility, appropriate muscle stretching of the neck and upper quarter, as well as functional stabilization exercises.
Exercise 01 of 07
Exercise demonstration
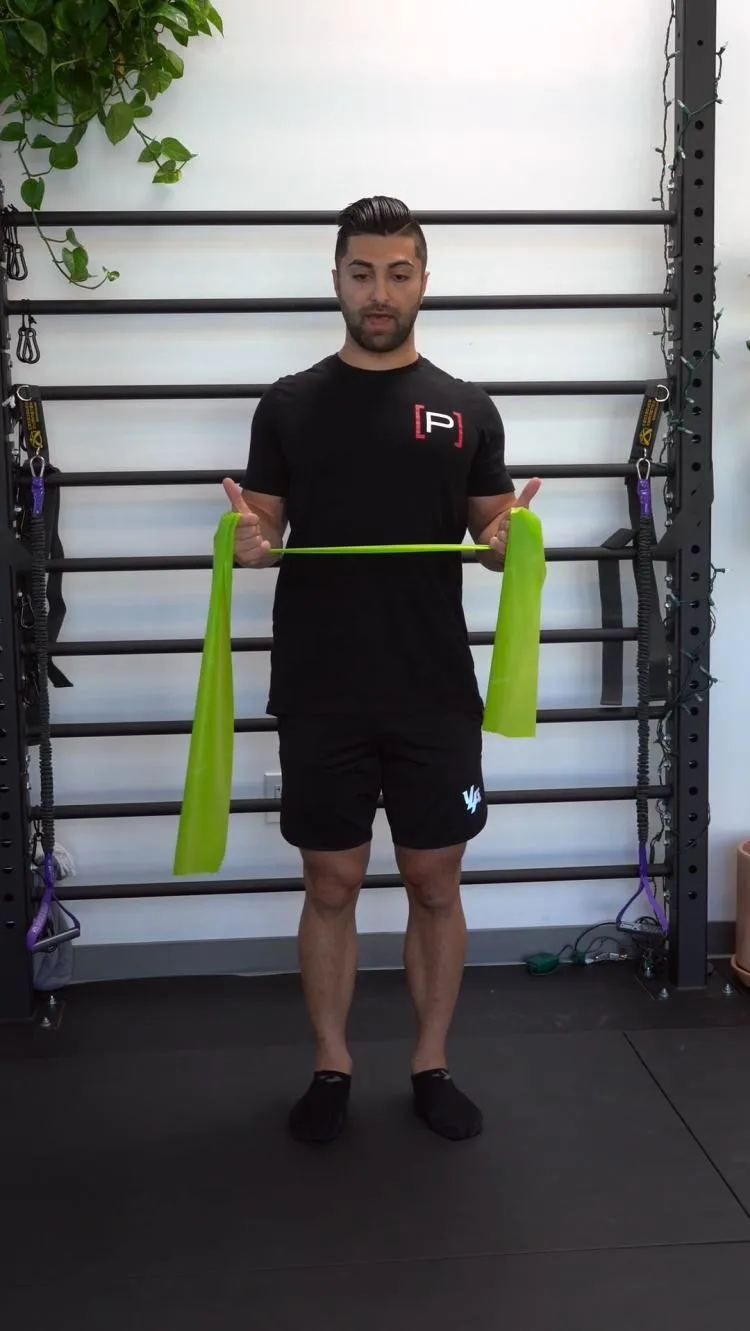
Bilateral Shoulder External Rotation - Band
View exercise instructions
- HOW: While keeping your elbows at your side, focus on spreading the arms as far as you can while holding onto a band. Initiate this motion with the shoulder blades and allow your arms to follow. The firmer the band (Double up the band if appropriate) or the more you tighten up the band, the more challenging this exercise will become.
- FEEL: Primarily the muscles on the inside of the shoulder blade with some assistance with the muscles on the back of the shoulder.
- COMPENSATIONS: Keep the low back from arching.
Exercise 02 of 07
Exercise demonstration
Seated Chin Tuck

View exercise instructions
- HOW: In a seated position focus on tucking your chin towards the front of the upper part of your neck. Think about creating a "double chin".
- FEEL: You will feel the muscles in the front of your neck activating. You may feel a stretch in the back of the neck at the base of your skull.
- COMPENSATION: Try minimizing excessive neck motion, realize this is a smaller motion focused on moving the skull on the cervical spine. There will be some cervical motion, but not excessive motion. For instance do not let your entire neck bend forward (chin to chest).
Exercise 03 of 07
Exercise demonstration
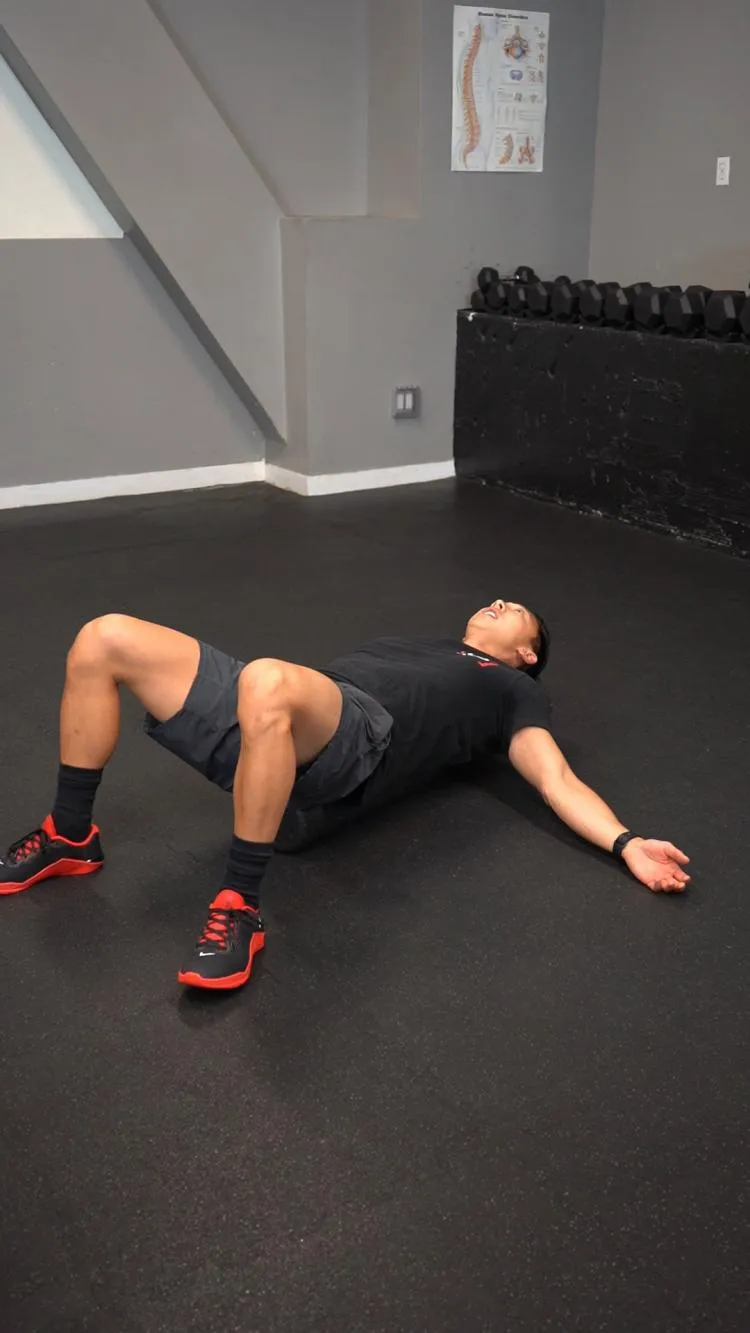
Supine Pec Stretch - Foam Roller
View exercise instructions
- HOW: Lay on a foam roller with it going right down your spine and your neck supported. Your feet should be flat on the ground with your knees bent. Bring your arms up and out at the side with your palms up. Let gravity pull your arms down creating a stretch in your chest. Hold that for the prescribed amount of time.
- FEEL: You should feel a stretch in your chest muscles.
- COMPENSATION: Make sure your neck is supported on the roller. The roller needs to be directly down your spine.
You will feel a deep stretch in your chest muscles. Make sure your neck is supported with this exercise.
Exercise 04 of 07
Exercise demonstration
Thoracic Spine Mobility using a Foam Roller
Sample Thoracic Outlet Rehab Program Exercise
- Place the foam roller perpendicular to your spine. While grabbing onto a stick/pipe, elevate your arms as far back as you can in an attempt to touch the floor. This movement is very similar to a wall angel.
- Spend a few repetitions on each segment-then move up toward the next. Don’t allow your butt to come off the floor or your ribs from flaring out this is typically due to compensation from your low back!
- A more aggressive way to perform this exercise is by using an external load of weight as shown here. This will make the stretch more passive and less active. A stiff thoracic spine may contribute to issues up the kinetic chain to the shoulders/neck.
- Self-mobilize the thoracic spine for 2 minutes. You can keep your head supported with your hands if you feel like you are straining your neck.
Exercise 05 of 07
Exercise demonstration
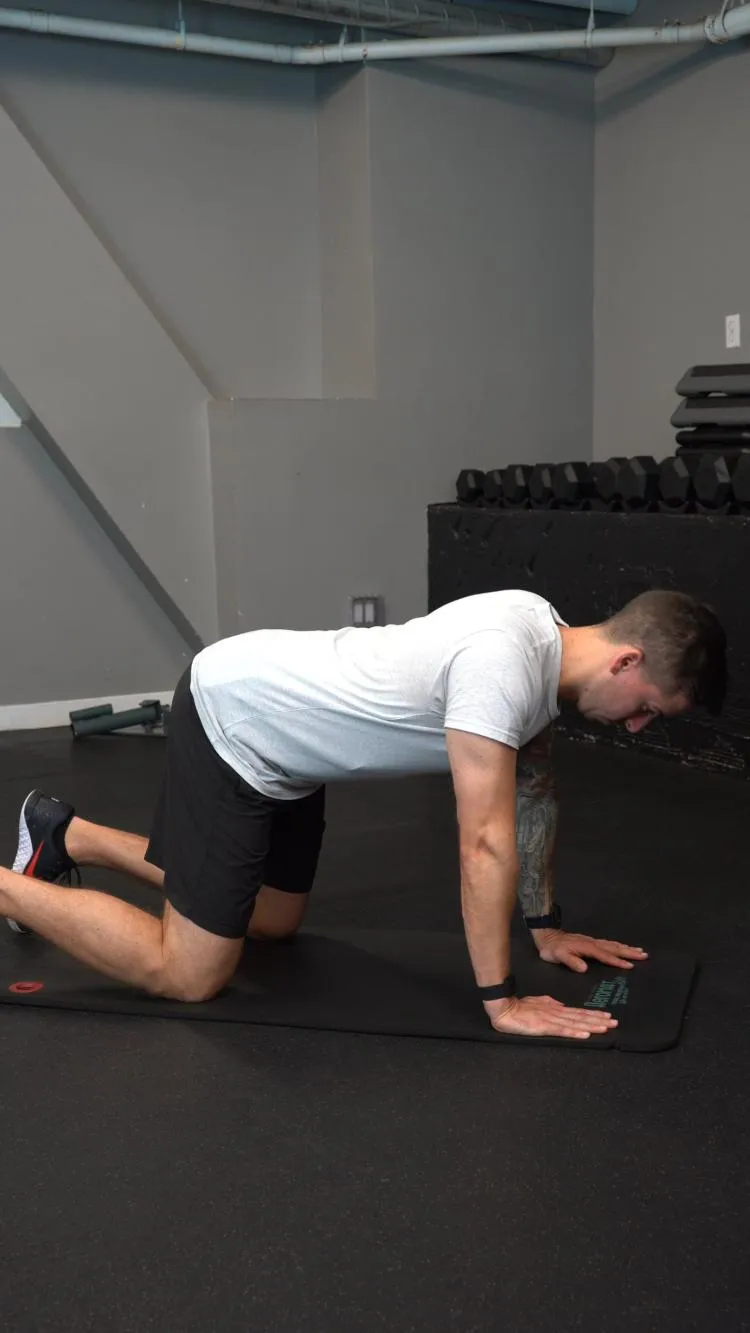
Quadruped Push Up Plus - Chin Tuck
View exercise instructions
- HOW: Begin the exercise by positioning yourself on your hands and knees in a quadruped position, shoulders stacked over hands and hips over knees. Perform a chin tuck and maintain that head/neck position the entire time. Then perform a push-up plus by keeping your elbows straight and pushing into the ground - separating your shoulder blades from one another and moving your chest away from the ground. Reverse the motion by letting your shoulder blades come together and your chest drop towards the ground. Repeat
- FEEL: This should feel like a coordination exercise as you're focused on maintaining head and neck position while simultaneously moving your shoulder blades. You may feel a gentle stretch from the bottom of your neck to the base of your skull. You may also feel your neck muscles working to maintain head position.
- COMPENSATION: Do not move the rest of your body. Do not lose head/neck position as it should be parallel to the ground. Keep your elbows straight, just move from your shoulder blades.
Exercise 06 of 07
Exercise demonstration
1st rib mob
There are two mobilizations here. One is for your first rib, the second is for the scalene muscles. These may help open up space in between the Costoclavicular or Subcoracoid space.
The brachial plexus (a network of nerves running from your spine down your arms) is running directly over the 1st rib, thus when elevated you can see how pressure is put on the nerves and vessels passing through this area. This is called TOS and symptoms often consist of limited neck & shoulder range of motion. This syndrome may also be associated with pain in this region that can travel all the way down the arm. When performing the mobilization, be careful, there are a lot of tissues around this area (4,5,6).
- Sit on the back end of the towel and wrap the towel around the top of your shoulder girdle. Bring the other end of the towel down towards the opposite hip.
- For the second stretch here, stabilize your scapula by sitting on your hand or holding something like the bottom of the chair shown here. While maintaining a slight chin tuck side bend your head in the other direction.
- Perform these for 2x30 seconds each.
Exercise 07 of 07
Exercise demonstration
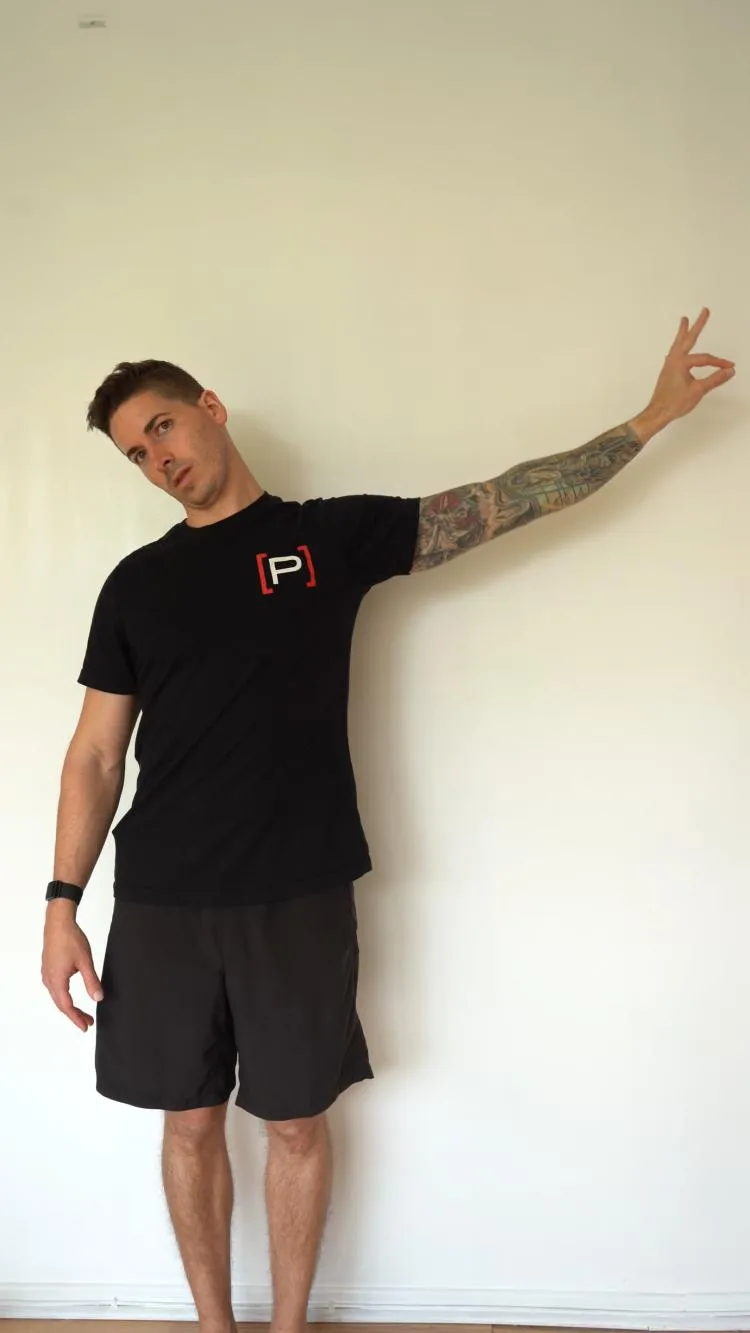
Ulnar Nerve Slider
View exercise instructions
- HOW: Start in a standing position with your index finger and thumb together with your other three fingers straight, extended, and spread apart. Perform the nerve mobility exercise by turning your palm towards the ceiling with your fingers pointed up, make a circle over your eye on the same side with your index finger and thumb with your palm facing your face, get your elbow up high and out to the side as much as you can. Then while keeping hand position and finger position, reach as far as you can out to the side away from your body with your palm facing away from you. Simultaneously bend your neck and head in the opposite direction of your moving arm to what you can tolerate. Return to starting position and repeat.
- FEEL: You may feel a pulling sensation into your pinky, ring finger, and on the side of your neck that you're moving your arm - this is normal. It is a matter of what you can tolerate.
- COMPENSATION: Do not lose hand and finger positions. Watch video for other tips and details.
Often time the ulnar nerve is the culprit of the numbness and tingling going down the arm into the ring and pinky finger. Start in a standing position with your index finger and thumb together with your other three fingers straight, extended, and spread apart. Perform the nerve mobility exercise by turning your palm towards the ceiling with your fingers pointed up, make a circle over your eye on the same side with your index finger and thumb with your palm facing your face, get your elbow up high and out to the side as much as you can. Then while keeping hand position and finger position, reach as far as you can out to the side away from your body with your palm facing away from you. Simultaneously bend your neck and head in the opposite direction of your moving arm to what you can tolerate. Return to starting position and repeat.
- This ulnar nerve mobilization may help with these symptoms. Be very gentle with this mobilization, as irritation here can lead to a delayed response in pain.
- Perform very slowly for 2x15 repetitions
Closing Thoughts
With all these exercises, proceed with caution. We recommend seeking advice from a professional when dealing with a diagnosis such as Thoracic Outlet Syndrome. This is a difficult syndrome to diagnose and sometimes may seem a bit ambiguous. The evidence is not great around Thoracic outlet syndrome, most studies cited here are level 3,4, and 5 evidence. Despite this, the prognosis is often good with conservative care!
Take Control of Your Neck and Mid Back Health
Neck and Mid-back pain truly lets you know how connected the movement system is. It can create discomfort not just in that area but can refer to uncomfortable sensations down the arms, around the ribs, or even wrapping around the head. This can be resolved by improving neural mobility, postural control, and strengthening the unique muscles in this region.
REFERENCES
- Lindgren K. Thoracic outlet syndrome. International Musculoskeletal Medicine. March 2010;32(1):17-24. 2011.
- Laulan J, Fouquet B, Rodaix C, Jauffret P, Roquelaure Y, Descatha A. Thoracic Outlet Syndrome: Definition, Aetiological Factors, Diagnosis, Management and Occupational Impact. Journal Of Occupational Rehabilitation [serial online]. September 2011;21(3):366-373. Available from: CINAHL Plus with Full Text, Ipswich, MA. 2011.
- Andrew K Chang, MD et al.; Thoracic Outlet Syndrome in Emergency Medicine; Medscape. 2014.
- Hooper et al. Thoracic outlet syndrome: a controversial clinical condition. Part 2: non-surgical and surgical management. 2010.
About The Author
Arash Maghsoodi, PT, DPT, CSCS
Prehab Co-Founder & Chief Marketing Officer
 Arash Maghsoodi received his Doctorate in Physical Therapy from the University of Southern California. For his undergraduate studies, he attended San Diego State University and studied Kinesiology. After sustaining a career-ending ankle sprain while playing collegiate soccer, he realized how disabling and life-altering injuries can be. Arash currently resides in beautiful Santa Monica, California. His clinical experience is primarily in the orthopedic and sports setting. He has treated a wide variety of conditions ranging from the post-operative individual to the professional athlete. Arash is keeping the family legacy of becoming a physical therapist, as his mother is a practicing clinician of 30 years in the Orange County area.